
Strip Planking
A brief description, not a boatbuilding class
Strip planking is a form of carvel planking. The hull is built over forms using strips of wood, edge-glued, and edge fastened together. The strips are kept narrow so that there is very little shaping required. Strips are usually a minimum of 1/2" thick, with a maximum width of 1 1/2 times the thickness. With modern epoxy adhesives, it is the glue and not the fasteners that holds the hull together.
A related method (our Stripper) uses strips of wood, edge-glued, faired, then coated inside and out with epoxy and fiberglass cloth. In this method the glue joints are less critical as the hull ends as a composite; the wood serving as a core. The glue joints only need to be rigid enough so that the hull can be faired and glass cloth applied without the hull deflecting from shape. This method is used on canoes and other small boats and planking thicknesses may be as thin as 1/4".

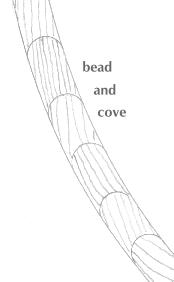
Strips can be cut from wider lumber and fitted to the previous plank as required by the curvature of the hull, or they can be "bead and cove". Bead and cove is somewhat like a ball and socket. One edge of the wood is concave, the other convex. This method eliminates having to fit each plank to the previous plank.
Ideally, planks are long enough to put on in one piece, ideally, but it usually doesn't happen that way. Longer planks can be made by scarfing two shorter planks. Scarfing involves cutting the ends of the planks on a long bevel, lapping them, and gluing together. The length of the scarf should be at least five times the thickness of the plank. Scarf joints should be glued on a flat surface and allowed to thoroughly cure before installing on the boat.
Making bead and cove/buying bead and cove
If a design calls for 1/2" thick planks, the planks can be ripped from 3/4" material. Bead and cove bits are available for shapers and routers, but if you intend to shape your own, it is best to rig up a long table on both sides of you shaper as the long thin pieces can be difficult to handle. Alternately you can purchase the lumber already milled. The lumber used in the project shown below is bead and cove Western red cedar, ordered from Flounder Bay in Anacortes, WA. (See MISC/List of Lumber Suppliers)
To nail or not to nail.
With epoxy, nails are redundant. If you are building a boat with 3/4" thick or thicker planks, nails can be a great help in construction, allowing you to hold the planks in place without a lot of clamps. For thinner planks, you may find yourself abandoning fasteners as they are difficult to drive straight in the time allowed by the glue, and many of the nails will come out one side or the other. Galvanized finish nails are frequently used but may not hold if the wood is soft and there is a lot of twist in the plank. In such a case it is best to use ring shank boat nails or clamps. If using thickened epoxy, the purpose of the fastener is to hold the plank in place until glue sets.

|
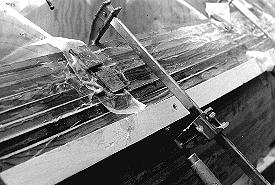
Here a cleat has been temporarily attached to the planking to facilitate clamping. "Washer" blocks are also shown. Squares of plywood are laid on polyethylene film, nailed through to hold planking to the form. The planking can be clamped to the form if cleats have been added to the perimeter of the form. |
Forms
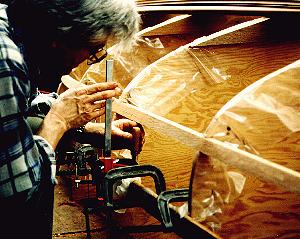
 All of our strip planked boats use temporary forms without permanent frames. If forms are meant to be temporary, the edges should be covered with polyehtylene to prevent the planking from sticking to forms. It is important that the planking strips be held tight against the form in order to eliminate a lot of unnecessary fairing. It is usually necessary to use temporary fasteners into the forms or clamps to keep the hull shape. If the forms are plywood (usually the case) it is best to glue strips of wood around the perimeter of the form and trim to the form contour. This allows you to fasten into wood or provide a place for clamps to grip. If there are to be permanent bulkheads in the hull, the planking can be glued and permanently fastened to them. Protect the surfaces of any permanent bulkheads with polyethylene film, as there is a lot of glue dripping.
Planking
Planking can begin at the keel and work toward the sheer or vice versa; or in the middle working toward the keel and the sheer. Any of these methods work, but some may have advantages on specific designs. If the hull is to be finished naturally, the planking procedure should be chosen for appearance. Natural planking looks best when run parrallel to the sheer. If natural, carefully select planks so that opposite sides match and keep joints tight.
When starting at the sheer it is easier to fit the first planks, which is an advantage for first time builders. The bottom planks become more difficult to fit, as longer and longer tapers are required at the keel. Luckily, with thickened epoxy, exact fits are not absolutely neccessary.
Planking from the keel toward the sheer almost insures that the planks will "run off"; that they will not run parallel at the sheer. If the hull is to be painted this may not matter, however, if the hull is not fiberglassed, the planking pattern will most likely become visible through the paint.
Fairing
In the case of a strip planked hull, fairing is a process of smoothing out the hull to give it a smoother (fair) appearance. When the hull is viewed from either end, there should be no visible bumps or depressions. Be careful if using soft woods like cedar. Cedar is very easy to "fair" away, and it is difficult to judge how much you are removing. During the planking phase, it is therefore important to keep the planks tight against the form so that you won't have to remove too much to make the hull fair. This is why clamping strips are installed on the forms; so that stubborn planks can be pulled into place.
A word about fiberglass
Traditionally planked boats cannot be successfully fiberglassed. The planks will move and something has to give. Strip planking avoids this by using narrow strips with rigid glue bonds. For fiberglassing to be successful, the inside of the hull must be well sealed.