Building the Glen-L Yukon
by Wayne Milner
Page 5
When using a Spanish windlass, a couple of things tend to happen: First, as the ends of the members draw in, the rope will tend to slide off the wood. Making a double wrap around each piece initially usually stops this. And second, the rope will be twisted to the maximum before the ends of the longitudinals are pulled in far enough. To get around this, tie another rope around the longitudinals involved and continue, releasing the first rope after the strain comes off. Once the chines were pulled in far enough, I put my handsaw against the side of the stem and cut off the ends.
Pulling in the sheer clamps was a challenge. These had to bend a long way. In my case, I was trying to bend 2x4s. When I had them hauled in about three-quarters of the way, I could see that I wasn't going to get them any farther with this method. The strain was just too great. I used the circular saw to rip the ends of the sheer clamps and laminated them in place.
As you can imagine, all this bending of the longitudinals to make them fit puts a lot of strain on the temporary frame bracing and on the building form, although I think that by using my method of attaching the longitudinals to the transom first and working forward, this problem is lessened. That's because, by the time you get to the bow sections where the strain really comes on, the rest of the hull has some rigidity.
It is important to check regularly throughout this process to make sure that everything remains properly lined up. Monitoring a string over the keel centerline and frequent checking with a level to see that the frames remain vertical will accomplish this. I also suspended a plumb bob from the string so that its tip was immediately over the tip of the stem. As the longitudinals were put on, I frequently checked the centerline location, checked the frames with the level, and checked the plumb bob location relative to the tip of the stem.
After I finished fastening the longitudinals to the frames, I noted that the plumb bob was hanging a little less than 1/2 inch to the side of the tip of the stem. I think this was because one of the sheer clamps or chine logs on one side was stiffer than the one on the other side. Thus, pulling them together resulted in unequal strain on the hull, causing the stem to shift slightly. Of course, everything was glued and fastened at this point, and it was impossible to move the parts to make things line up again.
To solve this problem, I marked a point on the stem immediately under the point of the plumb bob, and drew a line up the stem from this point to the center line on the keel. I planed material from the stem with the power plane until the tip end of the stem was under the tip of the plum bob. Now, when you look down on the end of the stem, there is slightly more material on one side of its centerline than on the other. Fortunately, this will be covered by later work, and will not affect the strength of the hull. This minor distortion would be reflected at other points in the hull, but it would not be more than 1/4 inch.
Fairing the frames, stem, transom, and longitudinals so that the plywood will lay flat against them is a fun job and is relatively easy using a batten and power plane-except for one thing. Several of the screws and bolts used to fasten everything together were in places where it was necessary to plane. By this time the epoxy had set up, so I removed and relocated the offending screws. The couple of bolts that were in the way were sawed off below the level to which I wanted to plane, and replaced elsewhere.
Planking the Hull
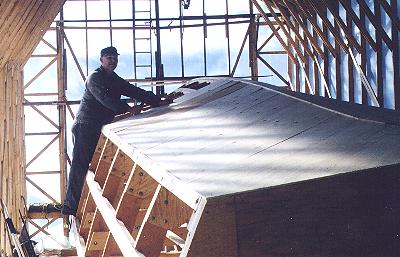
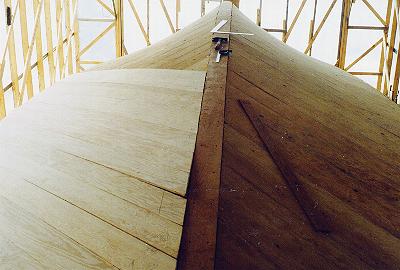
The plans called for the bottom of the boat to be double-diagonally planked with two layers of 1/2-inch plywood. I used one layer of 1/2-inch and one layer of 5/8-inch ply. This is a nice method of planking, but it takes a bit of time. Using 8-foot plywood meant that, in the mid-section of the hull, the strips got to be quite narrow (about 6 inches wide). I also used double-diagonal planking (two layers of 1/2 inch) in the bow area of the topsides where there was a lot of curvature.
The first layer of planking was nailed to the longitudinals and the second layer was fastened with stainless-steel screws through the first layer into the frames. The remaining two-thirds of the topsides was planked with a single thickness of 3/4-inch plywood. The procedure here was to fasten the sheet to the sheer clamp first, then bend it in to meet the chine log. To pull the sheets in, I drilled three 1/2-inch holes more or less equally spaced along the upper edge of each sheet near the chine, cut pieces of 1/2-inch rod about a foot long, and put the rods through the holes. Then I put a block, nut, and washer on the inner end with the block behind the chine log, and with a nut and washer on the outer end of the rod. When I tightened the nut, this pulled the sheet in where it could be glued and screwed to the chine log and side battens. After the sheet was fastened, the rods were removed and the holes filled.
 Planking: The first layer of 1/2-inch plywood planking was applied diagonally to the bottom.
 |
 Planking: The second layer of double-diagonal bottom planking is partially completed.
 |