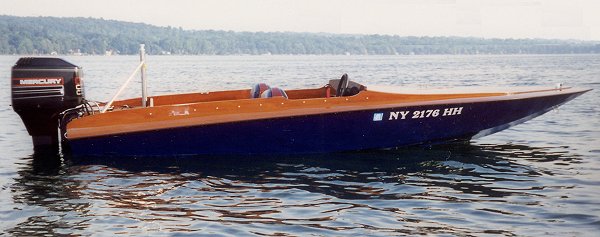
The Outrage as built by Tim Wahl, Livonia, NY
13 Dec 2004 Update
With a stock 90 merc the boat does 46-48mph. Using a ss prop
the speed is 48. We do a lot of skiing and wakeboarding so
the best prop lets the engine over rev by 200 when the boat
is almost empty and goes 46, but it has lots of get up and go
for what we do. ...love it.
2 April 2008 Update
"I'm now in the process of building the Outrage. Your picture gallery includes an Outrage built by Tim Wahl of Livonia, NY. I would like to ask him how he did the little boards with the white material in between on the front deck."Tim Responds:
I got your request from Gayle on the deck of the Outrage I built in 1998. I would be happy to answer your question.
What I did was resaw this piece of teak that I was given; it was 2" thick, so I sawed the planks to 3/8" thick by 1 7/8". I then put a mini tongue and groove on the edges, with a 1/8 tongue. I will admit to making a mistake - I coated the underside with two coats of epoxy and when the decks went on, the deck varnish stuck everything together. You can't fool mother nature and the tongues started to break as the boards shrank a little. So I had to take my Fein MultiMaster with a tiny saw blade in it and slice all the planks apart and then put in the caulk.
Here's what I should have done:
Saw the planks to 3/8" x 1 7/8" and put a 1/8" wide and 3/16" deep groove on the edge for the white caulking to go in. (Mahogany would be just as good.) Seal the underside with epoxy. Fasten them to the framing. (I used a counter sink and plugged the screw, and glue.) Varnish the top of the planks 10 times with light sanding between coats. After the last coat, I used 600 grit sandpaper and 3M Finnesse-It polishing compound. It sounds hard, but no matter what I do to keep the dust down, there is always crap in the finish when dry. The 600 grit and Finesse-It took about an hour for the whole boat. Use masking tape and tape on both sides of the 1/8" groove. Using a caulk for this application (I can't recall what I used, I think it was a Sikaflex product), push the caulk into the groove from the caulk gun, use your gloved finger to smooth, remove the tape. That's all there is to it.
If the 3/8" planks are not staying lined up with each other, you may need to run a small batten between the frames, say 1/2" x 3/4" under the planks. I also modified the framing profile just a little to give a little more upsweep and some curve, something you can't do with plywood.
The side decks are a neat feature too. I couldn't bring myself to using plywood for the decks, so I used 1/4" mahogany for the side decks. I built a wood strip canoe just before this boat so I had learned how to take 1/4" thick by 3/4" strips and bead and cove the edges. I ran my stock and glued two pieces together with a long scarf joint to form a 18' long strip. Then, starting on the inside piece, I glued it to the framing. The framing had more of an arc than the plans called for because I was using strips and I wanted the look. I relied only on glue on these connections. Once the first strip was dry, I could follow the it and run the second up tight to the first. I used about 9 strips per side. I was worried that it wasn't going to be strong enough, so while the boat was upside down getting painted, I used two part flotation foam, poured onto the underside of the side decks. That made the side decks incredibly stiff, and the boat will float upright if swamped.
Other details:
I used a stock 2 cycle 90 HP Merc and it seems to be a good package. It is very well balanced, goes 47 MPH, isn't back heavy, gets up on plane quick. I can scare my passengers if I want. It pulls water skiers very well. I also used a fin on the bottom, and it turns on a dime. I put a 12 gallon aluminum tank in the rear on the starboard side. I had it up front at first and it just seemed a bit front heavy. I also put the battery behind the drivers seat back, also on the starboard side. The prop thrust needs more weight on that side. One caution, it is a "V", but not really a deep-v, at only 12 degrees (I think). It doesn't like big waves.
Good Luck,
Tim Wahl, Livonia, NY