Basic Boat Window Installation
by Capt Patrick McCrary
www.Bertram31.com

The foremost discussion of sucessful window installation is of course cleanliness and preparation of all bonding surfaces. This includes the use of special primers recommended by the manufacturer of the selected sealant / adhesive.
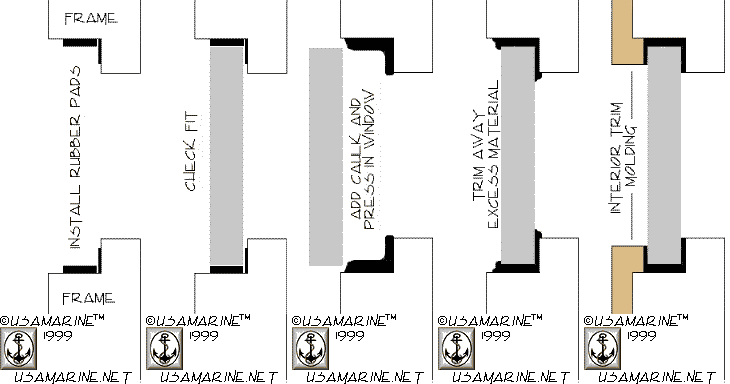
When installing boat windows, especially glass, use small pieces of 1/8" - 3/16" rubber or neoprene as padding points between the window and frame. I tack these pieces down with a dab of fast setting compound and let them cure. These pads are spaced out about every 12" and insure that the glass doesn't make contact with the frame during the installation and cure.
Make sure that all mating surfaces are clean and dry. Denatured alcohol is the best cleaner.
Apply a liberal bead of compound around the frame and place the glass, using enough pressure to squeeze out all excess material and contact the pre-placed pads.
Depending on your installation situation, you may need to keep the glass supported or braced until the compound cures... Be sure to make these decisions before you set the glass and are elbow deep in goo.
Think ahead and mask all areas, inside and out, that you don't want the compound to contact. Don't try to clean up non-cured compound, you'll just end up smearing further into the surface that you're trying to clean. Let the compound cure and then remove it with a razor blade and whatever other mechanical solution you need to use.
Windows should be beaded with the proper marine compound. Products that are principally formulated as adhesives, such as 3M's 5200 are not the best choice, For plastic, (Lexan or Plexiglas), I prefer Sikaflex-295TM, which is fast setting and comes only in a black color. For slower setting times, (and with a white color option), use Sikaflex-291TM. For mineral glass, (tempered or safety plate), use Sikaflex-296TM. More information on the Sikaflex Marine Products can be found on their website.
----- In Action -----
(3.5 sec per frame)

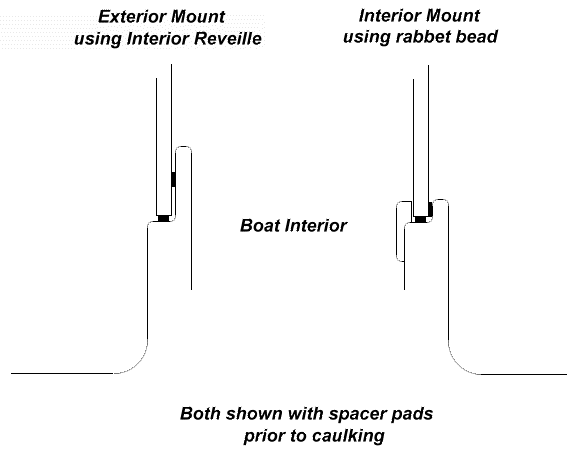
If you are building new or modifying an existing window opening, there are two ways that you mount your window.
If mounted from the inside, a rabbet bead is built in from the outside, if mounted from the outside, a reveille is built into the inside. The rabbet bead should be only about 3/4" - 1" in height and should employ an interior trim stop to trap the glass into the resulting channel. The interior reveille method is best done using no molding around the outside of the glass, so needs to be higher than the rabbet bead method. 1" - 1 1/2" is sufficient for smaller windows, (less than 12 sq. ft.) and a 2" height is fine for most larger windows.
For example, the total bonding surface of a 2' x 6' pane of glass against a 1 1/2" reveille, excluding the edges of the pane, would be just under 285 sq. in. Sikaflex-296TM has a tensile strength of 720 psi which would develope a total bond of the pane in excess of 200,000 pounds.

The draw backs to doing an exterior mount pane without trim are:
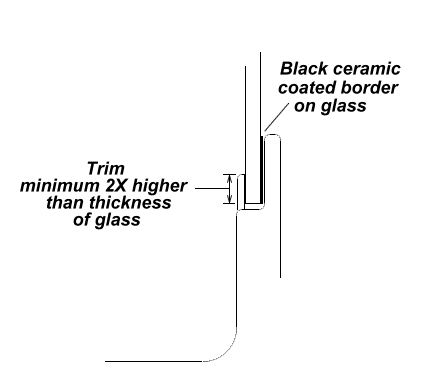
- The glass should have a black ceramic coated border, with a light
transmission of less than 0.01% (measured with Gretag D 200 visible range), on
the bond side to protect the adhesive from UV.
- The glass edges must be finished and true since they are exposed to view.

Both of these drawbacks are negated by applying an overlapping trim with a width at least twice that of the glass thickness, but then the look isn't as clean...
