
A place to share YOUR boat building story
Glen-L Marine Designs - 9152 Rosecrans Ave. - Bellflower, CA 90706
|
Performed by Jimmy Buffet & Alan Jackson |
 In this issue
-
It Just Keeps Getting Better &
Better by Gayle Brantuk
-
Glen-L Boatbuilder of the
Month
-
Everglade Camper Build by
Barry Bowles
-
Designer's Notebook: Lumber
Splices & Laminates
-
The Boat Parade of Lights by
ArtDeco
-
Photos sent in since the last
WebLetter...
-
Scarf Joint Techniques
-
Shop Talk: The Perfect
Sandwich
-
Recent email
-
Bob and Dave's
Excellent Adventure by Dave Grason
GLEN-L Update
- Last month I promised that you all would soon be able to see photos from the 2008 Gathering of Glen-L Boatbuilders (held October 26 - 28, 2008 at scenic Lake Guntersville, Alabama). I am pleased to tell you that you can now view the Gathering 2008 Photo Album, as well as the Gathering 2008 VIDEO Page . Over the next few weeks we will be adding more photos and videos, as well as refining the album and videos page, so check back often!
Until next month . . .
Editor
It Just Keeps Getting Better & Better
by Gayle Brantuk
The "Gathering" of Glen-L Boatbuilders Gets Better Every Year
The Glen-L Gathering of Boat Builders has become an annual event anxiously anticipated by all those on the Glen-L online Boatbuilder Forum. This year's event October 24-26 was once again a great success. The fun and frivolity took place at Lake Guntersville State Park in Alabama in an absolutely breathtaking background.

Before I go into all the wonderful happenings of the weekend,
I have to give credit where it is due. We have the best group
of folks in our online Boatbuilder Forum than anywhere on the
internet. These boat builders not only give of themselves to
help other builders online, but they all pitched in and
planned this whole event from start to finish. From keeping
the excitement going on the Forum and registering people to
attend, organizing and preparing food, awards, boat info
signs, clean-up and a whole lot more, these guys did it
all!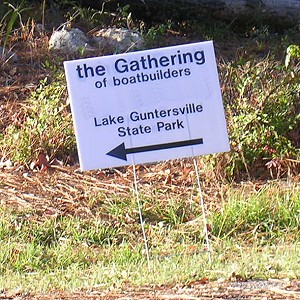
There were over 100 participants at the
event and more than 20 home-built boats,
mostly Glen-L designs with Stevenson &
Chesapeake Light Craft also represented.
The event began at the Lakeside Cabin area
under the Pavilion where everyone pitched in
with food and drinks. Food was prepared to
share with fellow boat builders and boy, not
only do these guys build, but they cook too!
We had Low Country Boil, pulled-pork,
"secret" recipe chicken wings, Brunswick
Stew, salads, lots of sides and adult
beverages.
Many stayed in the wonderful Lakeside cabins or camped out
at the campground either roughing it or in fancy RV's. A
few even stayed on their boats. After breakfast on Saturday
morning, provided by our Canadian friends and many others who
pitched in as usual, it was off to the marina with all the
boats!
Each of these boats was a unique creation limited only by
the skills and determination of the builder. There were
several classic mahogany runabouts that were
"ooohed" and "aaahed" over, a cabin
cruiser, a couple of mini-tugs, fishing boats, runabouts,
speed boats and more. Some brought finished boats, some
partially-done, some brought just their dreams, but all
brought a sense of joy and friendship.
Glen-L Boatbuilder of the Month
David Ainge - Union Jack
TOWNSVILLE, ON AUSTRALIA'S
TROPICAL NORTH EAST COAST...
I started building Union Jack Easter 2002. I was still
earning a living until the end of 2005 so building was
restricted to evenings and weekends.  Fortunately we live on acreage so I was able
to build at home, which was a great time-saver. I could do an
hour or two at a time, without wasting time travelling to a
building site (or having to go back home to fetch something).
After I retired at the end of 2005 I was able to work more or
less full-time on the project for part of the year. From
start to finish I spent about 4000 hours on the boat. Thirty
years ago I took 3000 hours to build a 37ft plywood yacht, so
I knew what I was in for this time.
Steel was a new challenge. I had basic downhand arc welding
skills, but had never done anything serious in the other
positions. I took a few lessons from a pro, then relied on
learning on the job. When in doubt I practised on scrap steel
until I felt competent to work on the boat. To this day I
still find vertical corner welds the hardest. At the
beginning I took some trouble to set up a strong and level
steel support for the boat, and that was time and material
very well spent. Contrary to the usual practice I built the
hull the right way up. I live in tropical Australia and most
of the year working in an upturned steel hull would be
unbearable, and the discomfort and sweat in the eyes would
wreck the concentration. I never had any trouble doing it
right way up, and apart from the advantage of ventilation and
light, it made handling the hull plates quite easy. Once the
frames were set up and firmly in place I rigged a primitive
hoist on top, and lifted the side hull plates into position.
When doing this I was always inside the boat, so that if a
plate fell I was safe.  In this way I was able to manage
large plates, and there are only three plates on each side
between deck and chine. I used masonite (hardboard) for
templates, and by taking trouble to get them right I managed
to cut the plates very close, with only a little trimming
needed here and there. I also used large plates on the
bottom, because I didn't have to lift them very far, and
if one fell there was no harm done, unlike a large piece of
steel slipping off an upturned hull.
Everglade Camper Build
by Barry Bowles
 I started this project on April 7, 2007.
On "Black Friday" November 28, 2008, instead of
going shopping, my wife and I finally our new Everglade out to Death Valley for the
weekend. A "shake down cruise," you might say.
It's not 100% done, but other than a few minor things on
the interior (the exterior also has some trim to be fitted)
and once the storage cabinet on the rear is complete it will
be done ("done" is a relative term; is it ever
really "done"?).
The things I was after when I decided to build this camper
were a larger bathroom/shower, a comfortable dinette, a
functional kitchen and one good bed.
#1 - The bathroom (the "Command Center"): This
area came out perfect. I modified the Everglade plans a bit
here. I didn't include a sink as plans specified, but
choose to get more counter space in the kitchen and I did
extend the front wall out a couple of inches. There is a
built-in epoxied drain pan in the floor for the shower with a
pop-up drain stopper. I used a household shower valve and
spray head. The bathroom is paneled in a bathroom paneling
that I bought from Lowes. I built a custom door for the
bathroom that had shelves and a towel racks built into it.
This came out great! There are no windows here, but there is
a fantastic fan in the ceiling for ventilation. 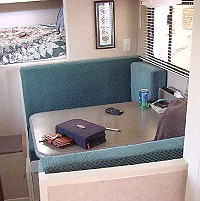
#2 - The dinette had to be comfortable because my wife and I
will sit for hours and read or play cards here when we go
out. We have no kids, so it didn't need to be made into a
bed, and I made it a full-on dinette. I used a material
called Staron (like corian, but made by Samsung) for my table
with 1-1/2" rounded edges. It came out beautiful. I was
able to make a large table top with a 3 compartment organizer
at the end by the wall.
Designer's Notebook: Lumber Splices & Laminates
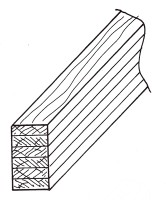
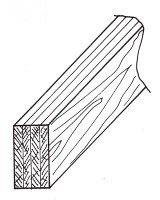
In addition, laminating can be done
for aesthetic effect. For example, beautiful
laminated members can be made by alternating grain
patterns and colors. Such versatility allows the
builder to select lumber in more readily available
sizes, instead of having to locate larger sizes of
lumber that may not be available or available only
at high cost.
|
The Boat Parade of LightsThe boat parade of lightsIs a really wonderful sight They form it in the harbor And parade with yuletide ardor This year there is a contest For best lighting in each context The yacht club put up a trophy And to enter there is no fee So I put my name upon an entry To become one of the gentry Who parade and then relate Stories of their yachts' gold-plate Though my boat is very sturdy She is a bit of a hurdy-gurdy Compared to craft heaven sent Which seem to dominate this event "Jenny" is a sloop very small With a mast that seems too tall In a line of yachts we are between A ketch and a yawl in position D-15 My rigging is full of lights Strung from every fitting and bight To power them, generators (a pair) Which hum and fume the air By competing in this public event The yachting locals may well relent They will have to take me serious So I'm feeling happily delirious But my lights are shorting out Water in the wiring, no doubt For this problem, I'm not suited I think I'm being electrocuted Then I make it past the stand Where the judges are at hand I'm very happy it's all over I feel like rolling in the clover I've done the parade of lights Now I can brag about it, all right! My boat may sit upon a trailer But I'm not just a weekend sailor In my joy, I fire off a flare It rises up, up, up into the air Without a plan or forethought It falls on the Commodores yacht Uh-oh …… -ArtDeco |
Photos sent in since the last WebLetter... |
Scarf Joint Techniques
A scarf joint is a way to extend
the length of a board by aligning long grain-to-long grain
surfaces for a strong and almost invisible seam. The longer
the seam, the stronger and less conspicuous the end
result.
These are photos of a scarfing fixture/technique that Glen-L client Bill Yonescu of Smithtown, New York has used for years utilizing a power miter saw (he says he "hasn't seen one like it published but it could be that everyone knows of it and it's nothing new").


Bill states that "it's simple to make and use and one should not discard the wedges left from the cut. They are great to use as wedge clamps in many areas of construction."
William Fuller of Dewitt, New York
has another take on this subject; a tablesaw jig for making
scarf joints.
"Make a tablesaw jig from a scrap of 1/2-in. plywood,
about 8 in. wide by 32 in. long. Attach a runner to the
bottom of the jig to ride in the miter-gauge slot. Trim the
edge of the jig with a pass through the sawblade. Now attach
a 5/8-in.-high fence angled to the blade at 5° (a slope
of 12:1). Install four or five hold-downs with machine bolts
and wing nuts, as shown. 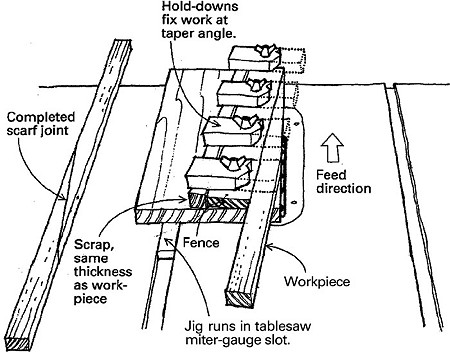
To use the jig, locate the piece to be scarfed tightly
against the fence, and clamp with the hold-downs. Support the
left side of the hold-downs with a piece of material the same
thickness as the workpiece. With the sawblade set slightly
deeper than the material to be cut, make a pass through the
saw.
To keep the joint parts in registration during glue-up,
drill a small hole through the splice, and drive in a small
round dowel or bamboo skewer.
 triumph with effort! |
Shop Talk: The Perfect Sandwich
Well, now that the Thanksgiving holiday has passed and Christmas is nearing in the States, I suspect that in addition to leftover nails, screws, bits and pieces of wood lying around your shops/garages/tents/miscellaneous work areas, many of you now have (or soon will have) some leftover turkey in the fridge, too.So for this month's Shop Talk I think I'll encourage you all to relax a little, enjoy a soft drink or adult beverage, and try out one of these incredible turkey sandwiches. Then after you've rested up and your extended families have cleared out, you'll be ready and able to get back to work on your Glen-L boatbuilding project with renewed enthusiasm, a full (and happy!) tummy and a big smile on your face . . .
Monte Cristo Sandwich
Serves 2
Although this sandwich can be quartered and deep-fried, many of the earliest recipes, like this one adapted from The Brown Derby Cookbook (Doubleday, 1949), call for frying it in a skillet, like French toast.

2 eggs
1/4 cup milk
Salt and freshly ground black pepper
5 tbsp. butter, softened
6 pieces thinly sliced white bread
4 thin slices cooked turkey
4 thin slices cooked ham
4 thin slices Swiss cheese
Confectioners' sugar
Red currant jelly
1. Lightly beat eggs and milk in a shallow bowl. Season with salt and pepper and set aside.
2. For each sandwich, lightly butter 3 slices of bread on both sides. Place 2 slices of turkey and 2 of ham between 2 slices of bread. Top with 2 slices of cheese and add last slice of bread. Trim crusts, secure with toothpicks, and cut in half on the diagonal.
3. Melt 2 tbsp. of the butter in a large nonstick skillet over medium heat. Dip sandwich halves, top and bottom, in batter. When butter foams, place sandwiches in skillet and fry until golden brown, about 2 minutes. Add remaining 2 tbsp. butter to skillet, turn sandwiches, and fry for 2 minutes more. Transfer to plates, sprinkle with confectioners' sugar, and serve with jelly.
Salvadoran Turkey Sandwich
Serves 6
Turkeys were "thoroughly domesticated by the Aztecs and other Mexican and Central American races long before the arrival of Europeans",
 according to
A. Hyatt Verrill in Foods America Gave the World (L. C. Page,
1937). Proof positive: this gently spiced turkey sandwich,
ubiquitous in El Salvador.
according to
A. Hyatt Verrill in Foods America Gave the World (L. C. Page,
1937). Proof positive: this gently spiced turkey sandwich,
ubiquitous in El Salvador.1 1/2 cups light beer
2 tbsp. olive oil
2 tsp. black peppercorns
2 tsp. sesame seeds
2 tsp. pepitas (dried pumpkin seeds; optional)
1 tsp. dried oregano
1/2 tsp. annatto seeds
5 cloves garlic
2 dried bay leaves
2 large turkey drumsticks (about 4 lbs.)
Salt and freshly ground black pepper, to taste
4 medium tomatoes, cored and chopped
2 small yellow onions, 1 chopped, 1 thinly sliced
1 green bell pepper, cored, seeded, and chopped
6 6" crusty Italian bread loaves, ends trimmed, split in half lengthwise
1 bunch watercress
1. Preheat oven to 350°. Purée beer, oil, peppercorns, sesame seeds, pepitas, oregano, annatto, garlic, bay leaves, and 1 cup water in a blender. Combine purée and turkey in a Dutch oven; season with salt and pepper to taste. Bring to a boil on the stove, cover, and bake until turkey is very tender, about 2 hours.
2. Purée tomatoes, chopped onions, peppers, and 1 cup water in blender. Transfer turkey to a plate (leave sauce in pot); let cool. Add purée to pot; boil over medium-high heat, stirring often, until thickened, about 45 minutes. Discard skin and bones from turkey; tear meat into thick pieces. Stir turkey into sauce, reduce heat to medium-low, and cook for 5 minutes. Season with salt and pepper. Divide stew between loaves; garnish with sliced onions and watercress.

Recent email:
Subject: F.Y.I.
Date: 30 November 2008
Hi,
Just wanted to share a quick story. My wife and I went to
Julian, California today. While we were there we went to an
old used book store. I was looking through the nautical
section of books (not much selection in a used book store in
the mountains) and there it was; a second edition "Boat Building With Plywood",
by authors Glen L. Witt and Ken Hankinson, 1978
copyright.
The book is in great shape, classic older pictures. The
original owner has highlights and notes in the book. I
thought that was cool!!
Anyway, thought I would share that with you.
Hope you had a great Thanksgiving!!
-- Steve Barnes
San Diego, California
Subject: The "Boatbuilder's Notebook"
Date: 1 December 2008
Dear Darla,
Love the "Boatbuilder's Notebook" I
got from you folks...so helpful...will help me on my next
build.
Very useful info in the notebook...good quality
binding....thanks again....you'll make a boat builder out
of me yet....Aye aye!
Thanks again,
-- Peter Rancourt
Hermon, Maine
Subject: New Boatbuilder
Date: 11 November 2008
Being my first boat, I have been following the instructions and asking for (and receiving) assistance.
So far I am very pleased with the outcome and have been referencing the Boatbuilder Forum, looking at the works of others.
With their inspiration and my perspiration, I know that I can do this.
Thanks much,
-- Dave Macco
Sheboygan, Wisconsin
Subject: Hankinson Interview DVD
Date: 18 November 2008
I enjoyed the video interview you did with Ken Hankinson. I am currently building one of his Barrelback 19 runabouts and it was interesting to learn about his background and to hear his discussion with you on boat design. His plans are well done and very accurate.
-- Gary Schoenfeldt
Olympia, Washington
Subject: Glen-L WebLetter
Date: 15 November 2008
I am a professional boat builder and over the years I have built at least 20 boats of your designs. I have found that the plans supplied by your company are much more carefully prepared and checked for errors than plans from other designers that I have used.
Thanks for all your good work,
-- Dale Johnston
Subject: Bullet Boat 7
Date: 2 November 2008
We are both seniors in high school now and started this when we were juniors. It took us almost a full year to build. We grew up together building things, none of which have come close to the difficulty of this project. We definitely under estimated how hard it would be but we definitely had fun throughout the project.
The plans left us with enough freedom to build it to our liking; we added a wind kicker on the front, which only serves the purpose of a dash to install the gauges and came up with a really fun and different paint job.
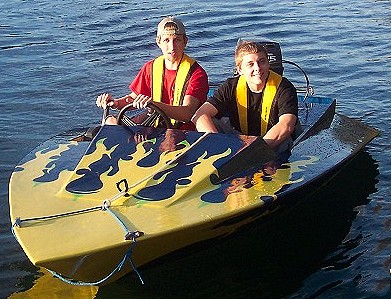
We learned many skills from this project like certain skills in woodworking, how to work with fiberglass, how to paint with a gun, wiring of electronics, welding on the trailer, pin striping with a brush, working with epoxy and others I cannot think of right now.
We are definitely proud of the boat that we built and are very happy with how everything worked out. It went about as flawless as it could.
-- Will Hopkins
North Augusta, South Carolina
Bob and Dave's Excellent Adventureby Dave Grason MASKEL AND GRASON LEAVE DWAYNE COLTON BEHIND . . . Wow, what a Gathering it was!! I really did enjoy it this year but when I first headed for Guntersville, I had no idea that things were going to end up the way that they did. To cut to the chase, I had heard that some of the Boatbuilder Forum members had made their way up river from Guntersville to Chattanooga via the river after the 2007 Gathering and I thought that that would have been a really excellent way to end the weekend. But for whatever reason, I'd forgotten about all that this year with so many other things going on in my mind, I guess.
Anyway, I had been pulling some all nighters trying
to get my Zip and my Glen-L trailer
completed at least to a more respectable stopping
point. Originally, I had wanted to arrive on Friday
but as of Saturday morning at 1:30am, I still
didn't have my trailer rolling, much less having
it painted or ready to carry the Zip. Finally, I
threw in the towel, ran home to grab a couple of
hours of sleep and about 7am I got up and headed for
the Gathering. |

GLEN-L boats, of course
