A First-Time Boatbuilder Shares
by Dean Toburen
DEAN'S INITIAL REPORT ON BUILDING THE GLEN-L MONACO
 As the Pennsylvania weather improved in the
spring of 2006 I set up the longitudinal stringers, started
to lay out and properly space the frames. The first keel lam
was in place on June 24, 2006. I used the center line of the
keel to align and set the vertical and horizontal of the
stem. This was not difficult but a little time consuming to
make sure everything was in line in both directions and
secured so alignment was maintained while installing the
chine and sheer.
At this point I may have varied from the recommended
procedures (* see Designer's Notes below) but I installed
some of the bottom stringers which seemed to give me some
stability before I tried to install the chine. For me this
worked well as I continued to check dimensions as each
stringer was installed. In an attempt to speed things up I
made a fixture for my router in the hope that I could use it
to make each groove for the horizontal stringers. That was a
nice idea which did not work. I found that by using a short
piece of stringer material, a back cut saw and narrow surform
I could accurately cut and fit each location much better and
quicker than by trying to use the router.
After all the bottom stringers, chine and two rows of side
stringers were in place I again probably deviated from the
suggested procedures (* see Designer's Notes below). I
installed the transom and then turned the boat right side up
to finish installation of the last two side stringers and
shear. I did this because I could not work stooped over for
long periods of time to cut and fit each piece.
 I have to say that the transom gave me the
most challenge. I read the instructions several times but
never could quite understand exactly how it was to be
assembled. Finally I decided to cut all the pieces and start
laying them together until it made sense. It did and
everything went together okay.
Now that the skeleton is completed it went back into the
shed to start sheathing with plywood. Since I am going to
fiberglass the hull I used exterior grade plywood rather than
marine grade. Hopefully this will be okay as I didn't
have any problems with the plywood cracking during
installation. Each layer received a coat of Epoxy-Plus and
was sanded before applying the next layer. The final
lamination of plywood was completed on August 12, 2008. At
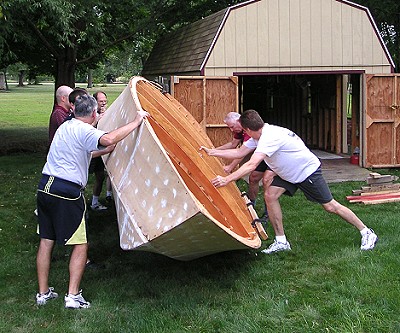
this time I again deviated from procedures and turned the
boat back right side up. My reason again is I was
running out of good weather her in Pennsylvania and wanted to
do some internal work during the winter when temperatures
allowed. I drilled the hole through the keel for the drive
shaft and rudder and started on some of the top decking
stringers.
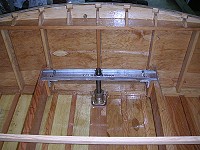
I now have installed an internal support allowing me to turn
the boat bottom up to complete the fiberglassing and
painting, then turn it back right side up to lift onto a
trailer for completion. During the winter of 2008 I was able
to install the shaft log and align the shaft with the center
of the rudder on the outside and with the center of the hull
on the inside. All this will be disabled for fiberglassing
and painting and then reassembled once the boat is on the
trailer.
Winter weather in Pennsylvania is not conducive to doing
anything that requires a warm environment. As soon as the
weather warms up I will fiberglass and paint. My goal is to
have this completed and the boat on a trailer by late summer.
If my schedule holds I will then be able to start on the
inside and probably work until sometime in December, with a
little auxiliary heat. January and February are generally too
cold to bother.
The schedule for now would be to have the interior completed
by the fall of 2010 to the point that I could have the engine
ready for the spring of 2011. My goal would be to launch fall
of 2011 but all depends on time, money and any unexpected
challenges between now and then.

This has been a fun, challenging and learning project. I will
keep you up to date with an occasional picture as we
progress. I appreciate all that Glen-L does for the amateur
boat builder. I would tell anyone interested that it is not
as difficult as it might seem but also not as easy as you
might like. Time and patience are an absolute
requirement.
Best regards for now,
--- Dean Toburen
Harleysville, Pennsylvania
*Notes from the Designer:
-
Turning the hull right side up
is okay,
but care must be taken so the hull is not distorted. -
Installing battens before
fairing means
you may need to fair the battens.