WebLetter 26
An Occasional Publication for the Home Boat Builder
Glen-L Marine Designs - 9152 Rosecrans Ave. - Bellflower, CA 90706
In this issue
- New Design: Party Boat
- On the Mark: Sanding tools
- Building the Yukon, Part 2
- Feedback: Cabin Skiff
- Designer's Notebook: Steering
- Feedback: Eight Ball
- Need Poxy-Shield input
- Recent email
GLEN-L Update
- Web site:
- Thanks to all of you who sent comments in response to S.L.'s email in
the last WebLetter. There were some good suggestions about how to improve the
Glen-L web site:
- We have added a subject index to the News Letters page.
- We have added a Recommend this site link to the Home page.
- We made a couple of small page changes in response to email (but I forget what they were). So keep those cards and letters coming boys and girls, we do listen to your comments.
- NEW Design: The "Party Boat". Read more about it below. It was designed to provide a lot of open space and bottom configuration to give a softer ride in rougher water conditions.
- To further "enrich" your WebLetter reading experience I have made several words "hot" in the text. These links will take you to other places in our site that will provide more information. In most cases there will be no "return" link, so use your browser "back" button to return to the WebLetter. Let me know if you like this feature.
- I am planning to put out a Poxy-Shield Epoxy WebLetter as soon as I gather together enough stuff to make it worth reading. I would appreciate any input.
- We have another edition of "Designer's Notebook" in this WebLetter. This is an evolving series and is currently being directed by your inquiries. This issue features a simple overview of boat steering.
- Thanks to all of you who sent comments in response to S.L.'s email in
the last WebLetter. There were some good suggestions about how to improve the
Glen-L web site:
Barry Witt
Editor
|
NOW AVAILABLE Exposed drum steerer for small hydros... |
New Design: "Party Boat"
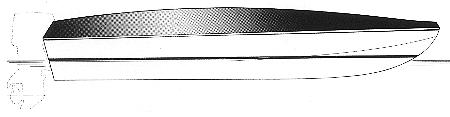
Catalog page
CHARACTERISTICS
|
Party Boat, deck boat, fun boat, call it what you will. It's a spacious wide open cockpit sitting atop an efficient hull. Pack it with passengers and take off to a remote area for picnics. Tow water skiers? Right on, and there is plenty of room for kibitsing passengers. Fishing? Sure, add a trolling motor and equip the bow deck with a chair and you're set up for some wicked fly fishing, bass or walleye chasing... and catching?
The interior layout shows cabinetry that can contain sink, stove, and ice box. The layout is versatile; the seats could be converted to berths, and with a canopy you have an overnighter. Or, modify the interior to suit the needs of your family.
The hull has a generous vee with flat area at the chine to cut the spray on a windy day and stabilize the hull at rest. The full length 15 o monohedron bottom assures flat running at all speeds and a soft ride when that afternoon chop kicks up. The forward deck area extends beyond the hull underbody to knock down spray and provide a roomy area for fishing or just plain relaxing.
The bottom is 3/4" thick reinforced with bulkhead type frames with vertical longitudinals between. And for ease of construction, the forward portion of the sheer is a patterned sawn harpin to eliminate bending wood around the curvature. This is a tough rugged hull. Power it with a total of 200 shaft horsepower and you'll hit speeds in the 35 mph range or, for economy, 65 HP will get you in the mid 20 mph range.
And the building should be well within the abilities of the average handy person. The complete plans include progressive written instructions, size, type, and number of fasteners to use at each junction is given and complete specifications for the lumber and plywood. Plus full size pattern with each frame fully detailed simplify the building even more; no lofting or dimensional layouts are required when you build the PARTY BOAT.
COMPLETE PLANS include FULL SIZE PATTERNS for each of the bulwark frames, harpin, stem, knee, and bulkhead frames and transom half sections. Plus procedural instructions that include a Bill of Materials and a Fastening Schedule. AND YES! We do have Fastening kits that include all the screws and nails to build the boat.
TWO FIBERGLASS COVERING KITS- Fiberglass Kit, Bottom, sides, transom
- Includes all material to cover the hull exterior bottom sides and transom; it does not include materials for covering the bulwark.
- Fiberglass Covering Kit, Complete
Includes material to cover the entire hull as above PLUS the bulwark, fore and aft decks, and coaming (the interior cockpit sides).
Each of the above Fiberglass Covering Kits include all of the materials, cloth, resin, hardener to cover the hull area described above. Plus we even throw in application tools, brushes, squeegees and rollers.- Plans and Patterns: $126.00
- Fastening Kit Bronze: $321.22
- Fiberglass Kit B,S,T: $583.80, Complete: $1186.76
On the Mark: Sanding tools?
by Mark Bronkalla

You may ask, "Why an article on sanding?" or say "Sanding is boring". Well, I found that sanding was the single most time consuming part of building the boat. I have spent 200-300 hours (maybe more) on this project sanding. It took more time than building the frame, coating with epoxy, laminating, fiberglassing or installing the engine! This is also an area where there is a definite trade-off of tools (money) versus time. If all I had was a hand sanding block and a small pad (1/4 sheet) sander, there could easily have been 600-1000 hours of sanding. Since sanding is NOT my favorite part of woodworking, the added time could have jeopardized finishing the project (and then no water skiing last year as well).
Material
Whatever method you use, you will go through a LOT of sandpaper. Just to make the point, for my Riviera, I used approximately:
| Hand / sanding board / 1/4 sheet sander
(whole sheets listed) |
20 sheets 36/40 grit 20 each 100, 220, 320 grit 5 each 400,600,800 3 each 1000,1200,1500 |
| Random orbit 5" disks (some 6" as well) | 10 each 40, 60 grit 100 sheets 80 grit 40 sheets 120 grit 25 sheets 220 grit Also, 3 sanding pads |
| Air file | 6 each 40, 60 grit resin coated 15 each 80, 120 grit |
| Belt sander 3x24" | 6-8 each 40, 60, 80 grit |
| Belt sander 6x24" (stationary) | 6 belts 80 grit |
| Disk sander 9" (stationary) | 6-10 mixed 60, 80 grit |
As you can see it pays to buy the large size packages (10, 25, 50 or 100 pieces) of sandpaper by the box or roll. You save over 50% compared to small packages (5pc pack at the hardware store) of the same product. I am also sold on 3M, Porter Cable and to a lesser degree on Norton and Klingspor papers. There is really no comparison to the "house brand" (Ace, True Value, Mirka, etc.) It is most noticeable with the 36/40 grit on the sanding board, the 3M paper is resin coated and the grit stays on. With some of the others, the granules just fall off in 1/3 of the time! I don't know if the name brand guys make the house brand papers, but there are sure corners being cut somewhere along the line. For the random orbit sanders, I use stearated (white) sandpaper which does not load up as quickly with finish or epoxy. Just be sure to wash off the piece prior to epoxy coating or varnishing to avoid fish-eyes.
Building the Yukon, Part 2
by H. Wayne Milner
This is the final installment of an article that we have posted in the MISC section of our web site. Many of you have been asking about M. Milner's project and we thank Mr. Milner and "Boatbuilder" magazine for permission to publish it.
Building the Yukon Part 2, Part 1.
Feedback: Cabin Skiff
or the importance of a flat aft bottom section
by Ray Macke
I just want to drop you an email to update the information about my Cabin Skiff. As you may remember I extended the hull by 2 ft to 18ft. I somehow erred in the process and ended up with a slight up sweep in the aft section of the hull. This resulted in a bow high situation at cruise and even with the power trim all the way down there was still a tendency to porpoise. I tried using a planing plate attached to the lower to correct the situation. It did allow me to trim properly but there was a definite drop in top speed. I also tried trim tabs and found that the performance drop was less but still present.
Since the weather has not be the best for boating this winter I decided to put it back in the shop. I wanted to see exactly what I had with the bottom situation and then decide if and/or how to correct it. Well I did just that and I was shocked! And embarrassed. I am ashamed to admit what I found because I still can't believe I missed this much of an error. I ran a straight edge along the chine to the transom and it showed NO problem - everything is flat as it should be. I then ran the line along the bottom of the transom from the chine to the keel it is also straight. BUT when running the straight edge down the keel I found about 18" from the transom it starts to sweep up and at the transom it is 5/8" above where it should be. That's 5/8 of an inch off in 18"!!!
I couldn't live with this - I had to correct it. What I decided to do is to take strips of hardwood 3/4" wide and cut to the exact taper needed to flatten the bottom at a particular point. I placed one of these on the keel and then continue with the next about every 4" to 6" across the bottom. These served as "guides" to establish the correct profile. Between these I cut and epoxyed some less accurate plywood wedges. These were simply installed to reduce the amount of epoxy paste needed to fill the void.
Designer's NotebookSteering for BoatsA boat turns in one direction or the other by a rudder of an in line inboard or by pivoting the propeller and lower unit on an outboard or outdrive. There are three basic methods of rotating the turning action required and transferring it to a convenient position actuated by a steering wheel or lever; cable steering, single push-pull cable, and hydraulic. There are others such as drag links but they are not common. Drum Cable SteeringTable steering has been around forever and earned a bad reputation, not without reason. This system operates through cable fastened to a pivoting arm on the rudder or outdrive (or outboard) and sent forward through pulleys to wrap around a drum fastened to the steering wheel. Properly set up, such a system is practical and reliable. Use clothesline rope, awning pulleys, or similar ill thought out replacements in the system and you're not only asking for trouble, you'll have it. The term "cable" refers to the flexible plastic coated steering cable or stainless steel 7 x 19 wire rope typically 5/32" or 5/16" in diameter. At aft terminals the cable is looped through eye straps securely fastened to the hull and held with clamps intended for cable steering systems. Pulleys or sheaves used in cable systems should be approximately 16 times the cable or wire diameter with a 2" minimum and may be fixed or pivoting types. The latter are common for smaller boats and special plastic/stainless steel with attaching eyes are available. Some "head scratching" must be used in planning so that the leads are fair and straight and the cable runs smoothly in the sheaves. Cable running in fixed sheaves must be aligned parallel to the sheave groove. A great stress is applied to the strap or base that attaches the pulley to the boat hull; bolts are preferable with long screws driven into solid wood satisfactory. Cables running between pivoting pulleys may tend to sag or not be in a precise straight line. Special cable guides with metal or plastic surfaces will take care of this problem although it is preferable these be minimal in number or better yet the system arranged so they are not required as they can abrade the cable over a period of time. A major problem occurs when cables are connected at the tiller; this terminology refers to a tiller on a rudder or the arm that pivots an outboard or outdrive. A straight arm projecting from a pivoting vertical shaft with cables attached as described in the foregoing will have slack in certain sectors of the turning arc. This cannot be tolerated. Special steering tension springs used at the tiller connection (see Fig. 1 and Fig. 2) will eliminate the slack problem. Cables connected to a pivoting rudder shaft with a quadrant as shown in Fig. 3, do not create slack and springs are not needed. The steerer with drum attached can be of two types, exposed or behind the dash. The exposed drum for the cable is in front of the dash (see Fig. 4) and is primarily used on small hydroplanes or race class monoplanes. Usually only one coaming pulley sheave per side is required and the entire cable is exposed for easy inspection and maintenance. The tiller cable on either exposed or behind the dash types should be of equal length each side of the drum and wrapped 3 or 4 times around it in opposite directions; check to be sure turning the steering wheel rotates the motor in the proper direction. Drum cable steering is viable but ONLY when properly installed and maintained. Crude materials and sloppy installation and maintenance can cause steering failure that can result in serious consequences. DO IT RIGHT OR DON'T USE IT. Push Pull Cable SteeringThe push pull cable is the most common steering system used on boats today. A push-pull cable consists of a semi flexible cable that slides back and forth inside a flexible sleeve covering. This outer casing is attached to the steerer and routed aft and anchored to the boat hull adjacent to the motor or rudder tiller. The interior cable sliding in the covering is actuated by turning the steering wheel coupled to ring gears or rack and pinion to convert the rotation to a push pull motion. The sliding cable tiller end has a solid or tubular bar that couples to the tiller of the motor or rudder by a swivel fitting to provide universal movement when rotated or to allow tilt up action of the outboard or outdrive. Numerous types of connections are used, those from outboards different than outdrives or rudder junctions. A push pull system is relatively simple to install. The cable comes in varying length to suit that required; Fig. 5 shows a method of measuring commonly used. Alternately a garden hose can be used to determine both the routing and length. The hose simulates the practical bends that can be made with the cable as sharp bends are impractical. Push pull steering is relatively maintenance free. A grease fitting is provided to lubricate the sliding cable and should be maintained per the maker. Corrosion and sticking of the inner cable can be a problem, routing the cable well above the bilge is essential, and cleaning the aft exposed portion should be a regular procedure. Hydraulic SteeringIf you have deep pockets, a good hydraulic steering system should be considered. They are primarily used on larger or more plush boats due to their cost. Basically, the rotating steering wheel operates a hydraulic cylinder to force hydraulic fluid through a tube to actuate a matching hydraulic cylinder. Routing of the connecting tube is simple and a myriad of connection devices are available to connect the fore and aft cylinder motion to the tiller. Some earlier systems did not have the tolerances required for efficient hydraulic use, but as usual, the market place took care of the problem, and hydraulics is an ideal steering system for craft of about 18' or more. |
Feedback: Eight Ball
Eight Ball/Brian Amato, Traverse City, Michigan
Back in 1974, I built an Eight Ball. It turned out just great! I towed that thing behind my Pearson-26 all over the Great Lakes, rowed it out to the mooring, year after year, and sailed it day in and day out. I finally traded it, 15 years later, for a metal lathe and I think it's still going strong. By the way.....the only glue I used was Weldwood "brown powder" glue. Never had a problem.
Now, March, 2001, Im building two more Eight Balls, at the same time. One for me and the other for my "significant other" and her children to learn to sail with. I figured it wouldn't be that much more work to build two of everything at the same time, and, so far, I'm right.
I decided to build in two different materials to test various approaches. One is being built using redwood where mahogony is called for and 1/4" luan plywood for all the planking and bow. The other will be built using Douglas-fir where mahogony is called for and DF plywood, both 1/4" and 1/2".
All frame ups were glued with Weldwood powder glue and the actual construction and planking used West System epoxy (which I really like).
Another test was to use an air nailer rather than pounding all those ringed nails. I simply went to Sears and bought 5/8" GALVANIZED nails for my nail gun. I've soaked some in water for weeks and they have never rusted. Let me tell you how fast it is to just lay a complete bottom plank in place and then just hit the trigger. Bap Bap.....and the whole thing is done. AND...I don't have to "buck" the other side of the boat (which usually means a helper crawling under the boat to hold the bucking bar in place while you pound the heck out of your boat.
Both boats will be in the water by the time the ice is gone.
Feel free to e-mail me or call me any time if you want to "talk 8-Balls".
From the Boatbuilder Connection in answer to Tim's question about painting, Steve recommended the Boat Painting Guide from InterLux. This is a downloadable manual, a good reference for when you get to the painting stage.
Need input on Poxy-Shield
I have a special WebLetter planned that will deal exclusively with our Poxy-Shield epoxy resin and would appreciate any input. Send your comments on Poxy-Shield, questions you would like answered, etc. We get a lot of epoxy questions and hope to answer most of them in this WebLetter. Share your experience. INPUT
Recent email:
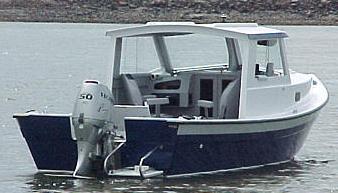
Shawn Auman sent in photos of his Fife. Someone had asked me whether I thought the Fife would be stable enough for flyfishing; so I asked Shawn...
Subject: Fife and fly fishing
Date: Thu, 29 Mar 2001
From: Shawn Auman
Barry,
I think the Fife would be stable enough for fly-fishing. I used to fly fish
myself from a canoe. The Fife will roll some but will not go over. I tried to
see how far it would roll to the side before taking on water. I am sure it can
be done but was unable to make it that day. You would probably have to stand on
one side. I think some of the comfort comes from being closer to the water than
a canoe. Forgive me for comparing her to a canoe. (That is what most people
think of when they see her on the water.) It might be small for more that one
fly fisherman. But is much better than a canoe and easier to get to where the
fish are than any flat bottom rowboat.
Shawna
Subject: newletter
Date: Thu, 8 Mar 2001 09:15:50 EST
---------------------------------------------------------------------------
Regarding the website: it works for me. I like the concept and have no
trouble finding the designs, hardware etc I am looking for. However, the
newsletter is another issue. Many of the articles have links to a continuation
of the tech article. A good example is the Rigging in #24. I had to save the
main body, then the other file with Chapter 11 continued. This is true for any
# of articles/stories. I think that is a great way to do graphics like the
photos of the Riviera from NZ in #25 but it is a major pain in the butt for
those of us who print this material for future reference. Another enhancement
would be a subject index or title index of the past articles. But enough of
this, I have to get back to enjoying this issue.
C'iao.
Sam Francis
West Grove, PA
Subject: Website feedback
Date: Wed, 7 Mar 2001 19:07:33 -0800
From: Patrick Rose
Greetings,
Just wanted to let you know I really enjoy your website, it is a good one.
Please don't change it. I also enjoy your newsletter very much. It gives me
encouragement to finish my current project and get back to building another
boat. I have several sets of Glen-L prints and have built one, a SISSY DO. You
do a great job. ...I find your website easy to navigate and use. It sometimes
take a moment to load the page I want to see, but that is due to this dinosaur
laptop I navigate with. Keep up the good work. Best Regards, Pat Rose
Subject: Register My Minuet
Date: Sun, 8 Apr 2001
From: John Grubb
Hi!
My name is John Grubb and I am building the Minuet. I have completed the hull
and ready to paint it before I turn it over. I have worked as a carpenter for
over 20 years and built almost anything imaginable but, building my boat has
been very enjoyable. The plans have been very helpful and thorough. The full
size patterns made building the frames a snap. My biggest problem is having the
time to work on the boat.
Subject: Guest Book entry
Below is the result of your feedback form. It was submitted on Tuesday, April
10, 2001
---------------------------------------------------------------------------
name: ed keene
Comments: Hello Glen-L guys and gals, Thanks for all of your help and tech support during the building of my Hunky Dory it has taken a looong time for me to be reaching the finish.
Have never been dissapointed with any Glen-L product, epoxy, fasteners, glass, plans,or service. The costs have been competitive with other suppliers.
It is especially nice to talk to Glen, a real gentleman. Has held my hand during the uncertainty of many decisions and how-to's for a first time builder. Keep your customer service level high it really makes a big difference.
Build more boats
GLEN-L boats, of course