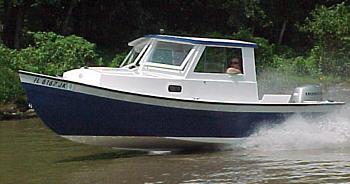
Ray Macke's Cabin Skiff
My first thought was just to trowel on the epoxy paste as smoothly as possible by hand but then another builder suggested a couple pieces of Formica (with mold release) backed with plywood could be pressed against the hull and make an almost finished job of it. I dug around the shop and found a couple of "sink cut-outs" from a kitchen project. They were about the right size, already had the plastic laminate on one side and were flat. I cut them to shape with each covering half the area to be repaired. I decided to do one side at a time so I troweled on the epoxy paste and then pressed the sheet against the bottom of the hull. I then wedged a piece of angle iron tightly between it and the floor which forced the excess out around the edges.
This worked well. When I removed the sections of countertop there were a few small voids where I didn't have enough epoxy. Most of it was very smooth and will require only light sanding to break the glaze to be ready for paint.
Once the work was completed I anxiously put the Cabin Skiff in the water to see if all the work was worth the effort. I had decided to leave the trim tabs off as I want it to be a true test of the hull without any lifting assistance. The boat was loaded with 11 gallons of fuel and 2 passengers (about 340 lb for all).
Tith the outboard trimmed all the way down I dropped the throttle. I immediately noticed that the bow did not rise and much as before and it seemed to plane a little quicker. I brought it up to cruise speed at about 5200 rpm and all was well - no bow bounce. In fact, I noticed that although the speed was good, the steering felt heavy and it really needed some up trim to lift the bow. I added considerably more trim than ever before to get it where it needed to be. I purposely trimmed up too far to get it to bounce but could stop it at any time but dropping the motor down a little. This is how it is suppose to be!