Pour Your Own Keel
By Mark LeMahieu
Page 2
Meanwhile, the owner of the print shop began thinking about the rest of the lead he had lying around and he decided to sell the remainder as scrap. He gave me first chance to buy and I finished my collection with 600 pounds that didn't need cleaning. I now had 1 ton of lead in my garage.
Making the Mold
The lead version of the Amigo keel is about 6 feet long. The top of the external keel is flat where it is bolted to the wood keel but the rest is an extension of the round hull shape so the form cannot be done in a wood box.
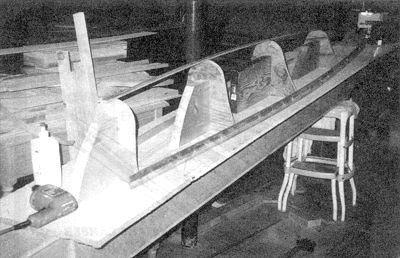
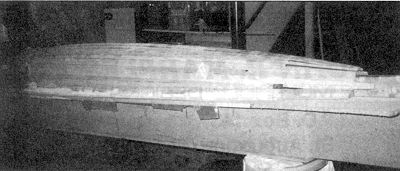
I took the lofted print and built a plywood form of the keel at each frame that touched the keel and one extra on either end. I then cut an inch off of each form, attached it to a flat board and planked it with cedar exactly like the cedar strip canoe I had built several years earlier. The cedar was sanded and faired so it had the round bottom and concave sides, the ends were cut to the proper dimensions, and it was fiberglassed and painted just like the canoe. Now I had a perfect male mold for my keel.
 Above and below: By taking lines off the plans, a mold was made using the same cedar strip method as used in the Glen L "stripper" canoe I had built earlier.  |
My female mold started as a box larger than my male mold. With the box dug halfway into the ground and leveled on sand, the male mold went in and wet sand was poured into the box between the box and the mold. I believe that if one had access to foundry sand this would give you the finished female mold but I didn't. Removing the cedar and fiberglass form, I removed about 2 inches of the sand in every direction. Then with the mold back in, I poured in dry brick/ sand mix that you can get from any local do-it-yourself home improvement place. The brick version has no stone in it.
With water added and a stick to work it into place, the mortar was leveled with the top of the box. After removing the mold, any voids were filled with a little more mortar and it was finished with plastic epoxy spreaders and the box was covered to keep the elements out.
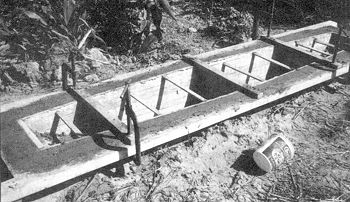
 The mold was set in
the box before pouring cement around it. The box was set in a trench and
leveled with sand. The form must be leveled in both directions. The mold was set in
the box before pouring cement around it. The box was set in a trench and
leveled with sand. The form must be leveled in both directions. |
The next day my female mold needed only a little rubbing to get any little chunks off and I now took drywall mud and got the surface even smoother. After that dried I painted the entire thing, with silver manifold paint from the local auto parts store. Without foundry sand I would probably use the same method again but I would use a propane torch to get as much moisture out of the mortar and sand before, the pour. Some of the nice surface I created exploded off, leaving half dollar-size lumps. They were easy to plane off but why do that if they can be avoided? The concrete that popped off merely floated to the top and was brushed off after it cooled.
A Source of Heat
During all this I kept reading magazines and looking on Internet boatbuilder forums for information on heating and pouring a lead keel. There was very little available and the little there was discouraged it as dangerous and foolhardy. The naysayers were everywhere, including Donald and my retired plumber neighbor who also had taken an interest in my project. Then I received my issue of WoodenBoat magazine and saw an article about pouring a lead keel. It was only about two-thirds the size of the Amigo's, and it was all straight sides poured into a wood box, but finally here was someone who had successfully done it.
The author was honest about what worked and what didn't, so picking and choosing what was needed for my application was easy. The wooden box wouldn't work for this type of keel but that problem was solved. I was more interested in the oven, fire and pouring.
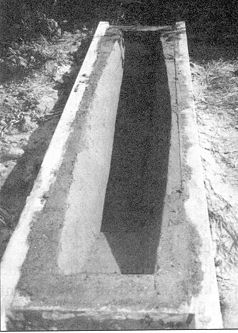
 The finished mold
was troweled smooth and drywall mud used to improve the surface after the
cement cured. The finished mold
was troweled smooth and drywall mud used to improve the surface after the
cement cured. |
Three things worked well for him and were incorporated into my setup. The author used a wood fire and found that he had much more wood than he needed. Old roofing steel was used on either side of the tub to keep heat concentrated on the container. The system for pouring without valves was the best lesson and I'll explain that later.
There were several things that caused problems. He used a bathtub set on blocks with a wood fire. When heated, the tub's enamel began to explode off of the cast iron, creating some pretty sharp shrapnel. The drain leaked when the lead began to melt. He also said he poured it in three separate pours. While it worked, I suspect he had trouble keeping that volume of lead molten; if possible, I wanted to do one continuous pour.
Taking off from their successes and problems, I built what I think was a better oven. Get to be friends with your scrap metal dealer. Bring him some aluminum cans once in a while and don't let him pay for them. He has many things you need and he also has a sort of kinship with those of us who do uncommon things. From him I got an old propane tank about 6' long by 30" in diameter, two sheets of used steel roofing, some 2" pipe, and many fittings, all scrap. When I was finished, I returned it all only slightly used.
With my 7-1/4" circular saw and steel cutting wheel I went to work. I cut four lengths of 2" pipe about 16" long for legs and cut a hole in the propane tank near the top about 8" x14". Of course you need to be sure there is no propane in the tank. Mine had plugs removed before I got it.