Building the Glen-L Yukon
by Wayne Milner
Page 4
To construct the frames, I laid out the paper frame patterns and transferred critical corner points to the workshop floor, making an adjustment for the change in the keelson size. I cut out the frame material to fit the marks, cut the frame gussets, laid the parts together, drilled them, then glued and bolted everything together with epoxy and 3/8-inch galvanized bolts. The top ends of each frame were tied together with a 2x6 at a level 30 inches above the set-up line as specified in the instructions.
After I got all that done, I found that I had inadvertently left the instructions for making the frames in the plans package. The only thing I hadn't done was to nail the frame material to the floor to keep it in place while it was being drilled. Not having done so wasn't a problem, as I stood on the frames while I was drilling them, and took care to keep them from moving.
The next step was to erect the frames, transom, and stem assembly on the building form. These components on a boat this size are fairly heavy. I used a block and tackle hung from my roof structure. It is important to set the frames up in their proper locations, aligned longitudinally, plumbed, and well braced. I set up the transom first, and marked the frame locations on the building form.
To increase the overall length of the boat, I increased the frame spacing by 10 percent. At this point, the shape of the hull was defined. It was only necessary to keep the frames, transom, and stem in their proper locations during the remaining part of the construction process to make the shape of the boat turn out right.
I then made up the longitudinal members. The keel was installed by fastening it to the frames with epoxy and stainless-steel screws, one piece at a time until the three layers were installed. The keel was tapered into the stem, and the two were fastened together with epoxy and three 3/4-inch threaded rods.
The sheer clamps, chine logs, and bottom and side battens for this boat are about 40 feet long. To assist in making up the 40-foot pieces, I fastened pieces of 2x4 lumber about a foot long to the vertical studs of my shelter so as to stick out horizontally about 3 feet above the ground. I laid out the pieces used to make the 40-foot longitudinals end to end on this makeshift workbench, and joined them together with 2-foot-long scarf joints. The scarfs were bolted through with three 5/16-inch galvanized bolts. I had used the same joint on a 24-foot boat I had previously built, and it had not come apart. Encouraged by this success I decided to do the same thing again.
My longitudinals were made from 2x4 lumber in pieces from 10 to 16 feet long. I tried to stagger the joints in adjacent stringers as much as possible. Notching the frames to receive the chine and shear longitudinals and the intermediate battens is fairly easy to do along the straight parts of the hull. I did this by laying the longitudinal up against the frames, and marking each one for the width of the notch by marking along the longitudinal, then setting the saw depth of cut to the thickness of the longitudinal, making several saw cuts where the notch is supposed to be, and chiseling out the wood. When this is done by an amateur, no matter how carefully you mark and cut, you will invariably end up with a notch that is too big or too small. If it is too small, cut a little more out. It will then invariably be too big. Fill the space with shims and epoxy. Trying to notch the frames in the bow section with any degree of accuracy is difficult.
Once the notches were made, it was time to fasten the longitudinals to the frames, the transom, and the stem. The literature I have read on the subject says that you should start by fastening the sheer and chine longitudinals to the stem and then bend them in to meet the other frames and the transom. I didn't do it that way, mainly because I thought my shelter wasn't wide enough to accommodate the unfastened ends. I fastened the longitudinals to the transom first, then bent them in to fit the frames. This worked really well, until I got up to the bow section. The sheer and chine longitudinals had to be pulled in a long way to fit against the stem. A Spanish windlass came in handy. I wrapped a piece of rope around the chine logs a little way back from where I thought the ends would be, tied the ends of the rope together, put a twist stick between the ropes, and twisted.
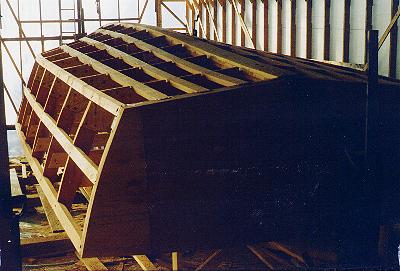
 The framing is faired, ready to receive plywood planking. Note "limber holes" through the frames.
 |