Shop Talk: Vacuum Bagged Mahogany Transom
Ken Schott

I started with a mahogany 2x6 S4S, then setup a long fence on the bandsaw table. I ripped 1/8" strips off of this 2x6, frequently checking for runout as the ripping went on. It was necessary to straighten the board as ripping went on, you cannot continually rip like this without some runout, a straight cut is essential to be able to get a smooth finished product. Some of the strips invariably are thinner/thicker than others, so pick out the consistent ones for use, the rest make good stir sticks. I think I acquired enough stir sticks for a lifetime of boatbuilding. A few strips would make a fine matching instrument panel. You can also put witness marks (V shape) on the face of the board before cutting it, thereby identifying the strips as they come off the rips in order. With the strips thus marked, you can lay them out in an orderly fashion, as in a bookmark grain manner. That is, each pair of strips mirrors each other in their respective grain pattern. The strips are laid out on the transom plywood and checked for length, size and coverage, then rough cut around the perimeter of the transom material.

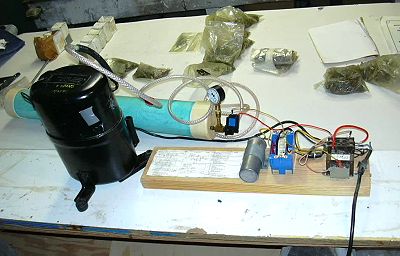
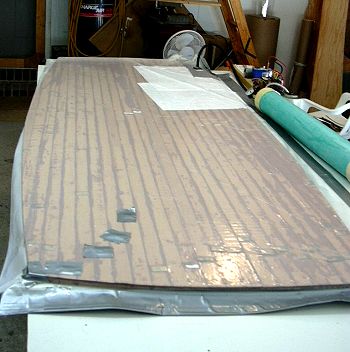
A heavy plastic bag is fabricated, like an envelope, for the vacuum bag, and checked for the manner to close and seal it. (check that you can enclose it in time for the glue cure). I used duct tape and glue to seal the homemade bag. An auto tire stem is used as the vacuum fitting for the bag. The vacuum pump is an air conditioning compressor hooked up to the low side of its plumbing. It is controlled with an under/over sense switch to kick the compressor on/off to maintain the vacuum. I rigged up a pipe manifold to hold extra volume of vacuum, as well as the fittings, switch, and gauge. The manifold is a section of 4" thick wall plastic pipe. I performed a dry run to check for leaks.

The mahogany strips are epoxied to the plywood with slow cure hardener, and stapled with a minimum of staples for a fastener free appearance. Seal it all up inside the bag and turn on the vacuum, excess glue can be seen squeezing out of the edges. Vacuum is left on until the epoxy has kicked-off. When it is all cured, cut it out of the bag and start the finishing.