On the Mark: Sanding Tools?
Continued...
With the random orbit sander, the no-name stuff wears out quickly, but it also has a more insidious problem. The grits are not graded as uniformly or applied as smoothly resulting in "swirliques" (Mirka especially). These are the little spirals that you find once you start staining or varnishing the surface. I do not think the "Spirograph" look is appropriate for a boat or furniture. If you get stuck with a batch of cheap sandpaper, run a fresh sheet on the cement floor for 10-20 seconds prior to sanding the wood. This will knock off most of the high points that make the swirls, but with somewhat shorter paper life.
Since you will be going through such quantities of sandpaper, paying 50-100% more per sheet for hook and loop rather than PSA (Pressure Sensitive Adhesive) is silly. Remember, when pricing out the sandpaper, boxes of hook and loop are typically 50 sheets and the PSA boxes are 100 sheets. It is better to either change back up pads (with another grit stuck on) or simply rip off the 1 out of 10 or 20 sheets that really MUST be changed to a different grit before it is worn out. Remember, you will destroy a couple of back up pads anyway. Buy them at the start, rather than having to rush out to the store after one flies apart (distance record so far is 15 feet and that one hit the wall 4 feet up from the floor). Shoe Goo (for repairing running shoes) works well for fixing a delaminated sanding pad, but takes at least 24 hours to dry.
If you think my sandpaper usage is extravagant, it is also part of the tradeoff of time vs. money. There was an excellent article in either Fine Woodworking or American Woodworker a few years back that compared not only brands of sandpaper, but also the effectiveness of sanding vs. time between paper changes. Sandpaper does not stay sharp for very long. You want to cut the wood fibers rather than burnish them. How often have you switched pieces of sandpaper and wonder why you had not done so 5 or 10 minutes earlier?
Tools
I have had many people ask "What kind of sander should I get?" After reading the above section, you will see there are several parts to the answer. First off, buy good tools. I am partial to Porter Cable and Milwaukee, but Bosch and Makita are good as well. With the amount of stress placed on the sander(s) when doing a project the size of the boat, it is nice to have the tool last the duration of the project. Look back through the Glen-L Boatbuilder Connection and the rec.boats.building newsgroup and you will see a number of complaints about burning out sanders. With the proper tools you will have working tools at the end of the project (for your next endeavor) rather than scrap / barely working junkers.
Sanding a boat is much different than sanding a piece of furniture. You are sanding at full load for hours at a time rather than the much more intermittent operation seen when doing a table or chair. The high duty cycle contributes to burnt up motors and bearings. The higher amounts of dust and the use of silica as a filler also contributes to greater brush and bearing wear. Better units have bigger motor windings and bigger, sealed bearings.
I have listed the various sanding tools according to use, with most used listed first.
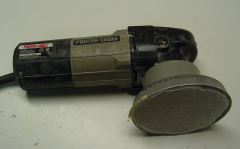 5" right angle random
orbit sander 5" right angle random
orbit sanderNote how paper wears off at edges first |
The best buy, as far as absolute bang for the buck, is a 5" right angle random orbit sander (~$110-150). Do not substitute the smaller vertical units, although you may want one as a replacement for a 1/4 sheet "Speed Block" type sander. I have a Porter Cable which has gone through over 500 sheets of paper, and is still going strong. I also borrowed my Dad's Bosch vertical random orbit as well as the Porter Cable vertical unit and they just did not compare for speed of material removal. They have a smaller orbit and quite a bit less power.
Sanding board top 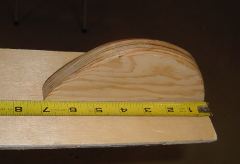
Sanding board handle Sanding board bottom - note 3 half-sheets |
Next is to make a long sanding board. The sanding board is nearly indispensable (and nearly free) for fairing the frame and getting the overall hull curvature fair. What you are after with this is large scale smoothness. The smaller sanders simply follow the overall curves and really don't take out the ripples. The sanding board will and its scratch pattern highlight the peaks and the lack of scratches will show up the hollows.
My sanding board is a 4.5" x 33" x 1/4" piece of plywood scrap. It has two roughly semicircular 7" handles on top. This board holds 3 standard half sheets of sandpaper. The paper is held on with 3M sanding disk adhesive (or contact cement could work, too). They are removed with the help of a heat gun and putty knife.
If you have a large air compressor (5HP belt drive 60 gal or more, 9+ CFM), then you can consider air sanders. An air file is great for fairing the hull and sanding after fiberglassing. It works like the sanding board in that it takes out most of the small ripples, but is powered by air rather than muscle. The air file consumes a LOT of compressed air. My 6.5 HP compressor runs continuously when I am sanding with it. This is a favored tool for auto body repair for the same reasons it works well here - smoothes out the curves. This is also the exception, where the Ace brand sandpaper worked very well.
Air File |
A 6" random orbit air sander is an inexpensive ($30-40) tool that also can remove material quickly, but overall, I prefer my 5" electric random orbit sander (less noisy, better speed control). Air compressors have come down in price considerably the last few years but still expect to pay $500-1000 for a suitable unit.
Rubber sanding blocks (at least 2) 3M brand has the right amount of "give". Having 2 gives you the ability to have 2 grits loaded. They also seem to hide very well (I actually have 4 somewhere), resulting in me having to go out and get another one rather than search for the one that went AWOL.
Stationary belt / disk sander. I bought a 6x48" belt + 9" disk Delta combination unit for this project. After using it, I wish I had gotten one years ago. It was used extensively for sanding the framing pieces prior to assembly and coating as well as for final tweaking of the many curved, angled and otherwise non-square joints in the boat.
This unit was ~$300 and works very well. Belt tracking and the quick change mechanism work very well. Prices for cheaper units may be up to ~$100 less, but you sacrifice the belt changing ease and I wonder how well they will track after a while. If the belt does not track well, you chew up the edge of the belt and start to destroy the sander frame. You can also spend 2-5 times as much as well. I think this one hits the right part of the price performance curve.
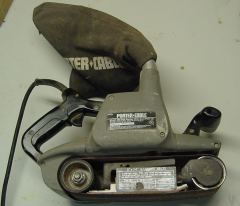
Belt sander - 3x24" |
Portable belt sander. Use a 3x24 or 4x24 (if you are really strong) unit. The small 3x18's are too small and you will start adding ripples rather than removing them due to the small platen and contact area on them.
The belt sander excels at removing epoxy squeeze out on the hull. It also made cleaning up the deck areas much easier when sanding after filling the gaps with the white epoxy mix.
The drawbacks to belt sanders are: cost ($200-250), weight, pull (from the belt moving) and risk of gouges. They are normally used on horizontal surfaces, but when doing the hull you will be working on vertical areas and even with it nearly upside down. It gets tiring very quickly, but the tradeoff is in the very high speed of material removal.
Be careful; if you tip the sander sideways, you will very quickly gouge out a stripe in the wood which will require filling or a lot more sanding to even out. If I did not already own one of these, I would be hard pressed to justify it for this project alone, but for furniture, floors, and other projects it is great!
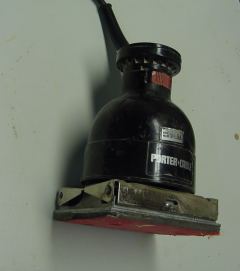
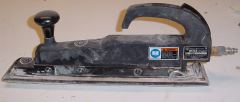
1/4 sheet finishing sander (Speed Block) |
Most people already have a 1/4 sheet finish sander such as a Porter Cable Speed Block. They are nice for fine finishing, but mine saw little use on this project.
The Porter Cable is the best of the bunch. I have used the Ryobi, Black and Decker, Dewalt, Makita and others. This one stands out. Mine is 20 years old and still going strong. Given the large surfaces involved, the random orbit sander is more appropriate for the majority of the work on the boat.
Detail sanders seem like a nice idea. I have a Ryobi and it is terrible (although the kids liked using it). It sands poorly, the vibration makes your hand quickly go numb, the paper is very expensive (by the square inch) and the switch failed already. I have hear good things about the Fein, but have not used one.
Of course, you will wear a dust mask when sanding. My favorite is an old 3M paint respirator. The charcoal in the filters is long gone, but it is comfortable, the air inside is dust free, it seals well over my beard and also tightly by my nose so my safety glasses don't fog up. Ordinary paper cup or surgical style masks don't seal as well. This leads to dust in your lungs as well as the annoying fogging problems for your safety glasses. Having a dust bag on the sander does not alleviate this point, but does make cleanup of the shop easier. Safety glasses are especially important with the random orbit sander. Mine have noticeable scratches from when pieces of the paper come flying off the edges of the disc.
If you find you are seeing "swirliques" when finishing, quickly sand with 1 grit coarser paper than used for finish sanding while the finish is still wet. That is, if you sanded to 220 prior to staining, sand out a small swirl with 120 grit. The paper will quickly load up with finish and sawdust, but you can get rid of most of the swirl if it is not extensive. Reapply the finish and continue on. Otherwise, you will have to wait for the finish to dry and then sand it all off.
Side note on ruggedness of good tools (and momentary stupidity). When building our house, we installed the hardwood floors ourselves. At that time, there was only one working outlet. I was sanding the floors and my wife was vacuuming. Having both the belt sander or the floor sander and the vacuum on at once would blow the breaker after a few minutes. This would mean a trip down to the basement to reset it. On about the 4th or 5th trip of the day, I reset the breaker and heard the belt sander start and go banging against things (my new kitchen cabinets) and then proceed bouncing and tumbling down the basement stairs. I had left the power switch locked on. After straightening the dust bag chute, it has worked well ever since.
We are very pleased to have Mark sharing his expertise with his fellow boat builders. If you would like to comment on this article to Mark, he can be reached at "builders at bronkalla.com". Replace the at with @. (Just trying to dodge a few spammers). See Mark's great web site for information on his Riviera project.